Posts

Showing posts from May, 2017

The Fireplace Project - Problem
Image
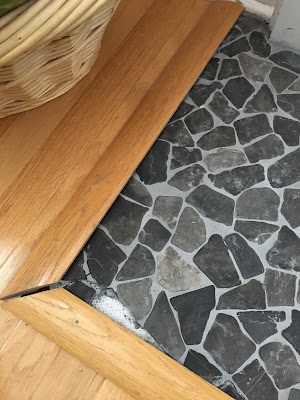
Houston, we have a problem. So, I was just assuming that reattaching the molding around the hearth was going to be the EASY part of the project. Not so much. Because of the pebbles being different height and some of it being underneath the trim, it won't nail into place as nicely as I assumed. Argh. After some brainstorming I've decided to just glue the trim pieces into place, which will allow more variance around the pebbles. And I'll pickup touch-up grout in this grey color to fill in the areas that fell off. Related Posts: Fireplace before photos Hearth demo day details All the Fireplace Project posts

My Mantra These Days

Image
I'm finding lately that every week is a little different. I can't seem to get myself into a daily or even weekly routine and, for awhile, it was frustrating. I think this was one of those assumptions I had of staying home: I'll have it all organized and scheduled. But that just can't be a reality of not heading into an office everyday. At least not for me, when I have so many different interests I'm indulging right now. So, I've adopted this attitude ... which is a Fall Out Boy lyric. Focusing on house work, or sewing projects, or garden, or writing, or job hunting, or travel ... etc. Just depends on who I am that week.  :) Related Posts:  What I'm Digging posts It's a Rebuilding Year My Favorite Influencers 

The Fireplace Project - Pebbling the Hearth

Image
My goal is to get this fireplace project DONE before our Memorial Day weekend festivities begin, so this week I'm focused on the hearth. Last week I chiseled out all the dumb tile , so the first step was to clean the area and get it ready for what's coming next. I've been to all the big box stores in my area for tile and decided on this pebble tile from Floor & Decor . Pebble Tile I went with the pebble tile because of the millwork that I decided not to remove . The old tile went below it, and I wasn't able to get it cleared out enough to squeeze the new tile in its place. And I'm not renting a tile cutter -- seems like a high level of difficulty. With the pebble tile, I can cut out the pebbles around the area then use the grout to clean up the edges. Voila! The Tricky Millwork With a Piece of Sample Tile So, in one day, I got the mortar down and laid the pebbles. It was tricky to get the sheets close together and there are definitely some larger-th...

Front Porch Project - Paint Concrete?

Image
On a recent trip to Michael's I spotted all the tools I'd need to stencil a design on the concrete floor of our porch. I've seen a few examples on Pinterest and they are super rad. The stencil and paint would cost around $50, with an additional $20 for the brushes and other tools I may not have in the house. And it would be an impressive DIY project that any guest would see as they were entering the house.  But ... I can purchase an actual outdoor rug for that price, so there's not much of a cost-savings in doing the project. And I have doubts on how long it would last. What would it look like next year? Will it just power-wash right off? Though ... an interesting, creative option.  Pretty Stencils, Though Maybe Too Small Exterior Paint Related Posts: Front Porch BEFORE pictures All Front Porch posts  

The Fireplace Project - A Wood Mantel??

Image
After I decided to go with version 2 of the Fireplace Project and not remove all the millwork around the fireplace, which I still think was a great idea ( see the post where I detail the change here ). I still had this piece of $10 wood I got at the reclaimed place laying around. I was thinking ... what if I just lay it on top of the current mantel?? Yes, it needs to be cleaned up and trimmed but what's the verdict? Yes? No? What Do You Think About That Wood Along The Top of The Mantel?  UPDATE: The wood piece on top of the mantel was VETOED by every member of the family. So there. It's gone. Related Posts: Fireplace before photos All the Fireplace Project posts

Super Deck is Sealed!

Image
In Progress: The Deck Getting Sealed Originally, this was going to be thorough post about waiting weeks for the right time to seal our new deck. Which, as everyone knows, must stay dry for 12-24 hours after being applied. I was going to write about the drama of having to halt on Monday when a freak thunderstorm jumped on the forecast. Then getting started Wednesday morning only to realize another Spring storm was going to pass through that night. It was a long post. But here's the upshot. I sealed it. It was super-easy and fast. It dried for about 12 hours before it was rained on. Not ideal, but that's life. The good news is it looks like it held up just fine. And now the deck is a pretty color and sealed against the constant Spring rain. And it was a super-easy project to sneak in among the Fireplace Project . Check that off the Spring to-do list! Related Posts:  The After-Pic of Super Deck

The Fireplace Project - Stone Installation

Image
Today was the day to install the stone around the fireplace. Glory day! I gotta say it took a few hours to complete but this AirStone was the easiest thing to install. I think I got VERY VERY lucky because the stones matched the EXACT size of the fireplace. Maybe I have a standard size fireplace. Or maybe the home improvement gods decided to shine down on me. Either way, I only had to cut two "stones" -- the rest I pulled directly from the box. First I had to attach that cement board so the depth in the middle area would match with the tile depth. I'll come clean and say I must have measured wrong because it was still 1/4" too low, but I don't think it makes a big difference. Then, I laid out all the pieces so I could pull the color and sizes I wanted. I tried to vary them as best I could so nothing looked matchy. It was very much like a puzzle. Once I choose my piece, I "buttered" the back with some adhesive and literally glued it to the wall. ...

The Fireplace Project - Demo Day

Image
After an attempt to pull up the tile in front of the fireplace with just the tools I had around the house, I knew I had to bring in the big guns. So on Tuesday I rented an 11 lbs hammer drill from Home Depot and within two hours that tile was UP. Before Photo: That One Tile Took Me An Hour To Get Up That's the Drill I Was Working With! Woowza!   I quickly learned it was all about finding the right angle of the chisel. I also learned that I had to stop after each row to sweep up the broken tile and dust. That was by far the worst part of the whole project. The house is now covered in tile dust. Me With All The Protection! The Finished Area! For the four-hour rental, I spent about $46. But I got that tile up and that space cleared for something new. Now the question is WHAT to put down there?? And how?? Related Posts: Fireplace before photos All the Fireplace Project posts

'Daughter of the Pirate King' Book Review

Image
As promised, here's a glowing review of a book you have to read right now. In a word: Unputdownable Daughter of the Pirate King Last weekend it was rainy and chilly, so I found my favorite seat in the living room and read this book. In three days. (The girls are getting really good at recognizing when Mom is reading and they need to make their own fun.) In a nutshell, this book is about Alosa the pirate king's daughter (duh) who gets herself captured by pirates to find a piece of a treasure map for her father. There's a CUTE BOY, nonstop action, a few twists I honestly didn't see coming, pirates of various aptitudes and a cliffhanger ending. A sequel is about a year away. Sigh.  Will definitely make my top reads of 2017 list. Thumbs way up! 

Breaking Up With Books

I have a hard time breaking up with books. If I make it a few chapters in, I will want to finish it no matter how uninterested I become. I feel obligated to get to the end. My friend Sonja would scold me: "Life is too short to read bad books." She should make a t-shirt. But, no, no, no... I started it, I'm committed to finishing it. Sometimes, I'll cheat and get the audiobook, hoping that will keep my interest. This was the case for the Raven Cycle books by Maggie Stiefvater. The narrator was just amazing and I'm glad I stuck with the books because they were all-in-all pretty awesome. But, I've been trying. Breaking up with a book is tough. You can't know what happens to the characters, or how the conflict is resolved, and be content with the happy ending. But, on the flip side, it's better to use that precious reading time for books that are worth the investment. (Is there a counseling group I should join?) I really dislike to be negative about ...

The Fireplace Project - AirStone Display

Image
Here's the display for AirStone at my Lowe's. Yes, I'm that crazy person that takes pictures of shelves at Lowe's. Yes! AirStone A box covers 8 square feet, which is probably more than what I need to go up to the mantel on my fireplace. So $59.97 might cover the cost of the faux stone. Plus the cost of the glue and whatever else I'll need so I'm estimating $100, on the high side. I'm leaning toward this slate Spring Creek because it's a bit darker and will stand out from my white walls. There's another color that has more beiges and tans and would match better with my floors, but I'm thinking that's not the direction I necessarily want to go in. I do have the option to buy one box of each color and mix and match. Hmm. Spring Creek This week, it's time to shop! Related Posts: So, yeah, my new basement bathroom is glorious Fireplace before photos All the Fireplace Project posts

The Fireplace Project - Version 2

Image
This weekend we had some work colleagues over for a Cinco de Mayo party (why do we celebrate Cinco de Mayo? Long story), including our house-flipper friend. After I showed off our new basement -- he was super-impressed by my tile selection in the bathroom thankyou -- I gave him the rundown of the fireplace project. He had a great suggestion ... why pull all that wood work down? It's pretty nice and there's a chance ripping it down might uncover a nasty surprise. Do I want to fix drywall? Um no. He recommended I just cover up the tile within the mantel frame, pulling off the thin inside trim piece to give the stone a really clean finish. I'll admit, at first I wasn't going for it. I want a chunky wood mantelpiece on top of all that stone (whine). But the more I thought about it, the more I recognized the wisdom. Less risk, less cost and a pretty great end result. Here's my "artistic" rendering of the final product ... He has also used the faux st...

The Fireplace Project - Tile Idea

Image
Ceramic tiles are super in right now. I found these in a clearance pile at our Floor & Decor store that recently opened up (perfect timing, thanks). Not exactly the right colors but in the right direction for the floor in front of the fireplace. The search continues.  They Were Around $2/tile, I Think. Check Out My Cute Shoes! Related Posts: Fireplace before photos All the Fireplace Project posts

The Fireplace Project - Measurements

Image
I made this image quickly for my trip to Lowe's and the Evanston salvage place. Sometimes, it's just easier to to write out the measurements on a photo than sketch a drawing. Plus, it turned out pretty cute and easy to share with you. Measurements The more I look at it, the more confidence I gain. And I really think the stone-look is going to make a huge difference in the room. Now, I'm just working out strategy. What goes first? I'm assuming I should start with the floor and work up. But maybe painting the brass should be first, in case I hit the tile? Hmm. Related Posts: So, yeah, my new basement bathroom is glorious Fireplace before photos All the Fireplace Project posts

Front Porch Makeover - The Sofa Fabric

Image
I scored this week on the sofa fabric for the Front Porch project. I got it at our Loomcraft Outlet that I've been to many times before for other curtain/upholstery projects of the past. My only two criteria for this fabric was: outdoor fabrics with navy in it and affordable. Here's what I found: Waverly Sun n Shade Outdoor Fabric  It was $9.99/yard, so I spent just over $40 on all that I'll need. Though, I'm not against returning to Loomcraft for some contrasting pillow fabric. Oh yes! Here's what that front porch sofa looking like again. We got it for our house in New Jersey probably eight years ago. There's a back cushion, too. It was soaked from all the rain, so it's drying out nearby. Once the cushions are dry. I can can them and get their facelift started. Related Posts: Related Posts: Front Porch BEFORE pictures All Front Porch posts Seriously, have you seen my basement? 

Front Porch Makeover - Before

Image
The other big project I'm tackling this Spring (can it be even called Spring if it's in the 40s?!?) is the front porch. It's forgotten because it's not used. But it's seen by anyone who comes over. So I want it to look clean and welcoming. Here's the Front Porch To Do List: Power wash the whole thing until it shines like the top of the Chrysler Building! Ok, but maybe  just looks clean.  Recover the cushions on the sofa that we've had for almost ten years. The orangey-red is dirty and washed out.  Paint shutters and front door a gorgeous navy blue. I've started looking at products because those shutters are aluminum. And there's four more shutters on the second four windows, so someone will be dangling out the windows sometime this summer to paint those. (Not it!)  Come up with something creative for the floor in the "living" area.  Hang plants, maybe ferns, from the ceiling to give it a Southern hospitality vibe and block the view ...

The Fireplace Project - Before

Image
I can't stop looking at my fireplace. And not in a good way. When we first moved in, I painted the trim white and it stood out because the walls were that awful beige. But last year, we painted the room white. So now, it's basically camouflaged into the wall. And it's all very builder-grade, including that horrible peach tile (that is also on my kitchen floor). There are too many days I want to take a hammer to it. Here it is in all its current glory: The Before Picture It's time for it all to GO! I really think we need to introduce some natural texture into this room. And some warm wood. I've been doing some fireplace Pinning and here's the goal ... I'm Not Planning to Hit the Ceiling, But I May Change My Mind I started scouting for materials that I can DIY and I found this product called AirStone at Lowe's. It's faux stone that is applied with glue directly to the wall. I checked it out this weekend and it's pretty cool. And I...