Posts

Showing posts with the label Home improvements

Bathroom Renovation Planning

Image
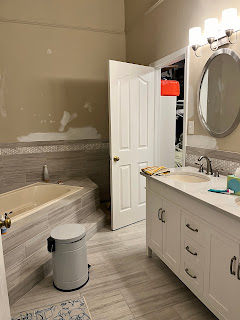
 Here we go again!  Our girls' bathroom has long been the last room on the checklist that sorely needs a renovation.  The current pictures tell it all; the vanity is outdated and faucets are leaking, the shower has plastic tile and a dangerous angle in the tub that I've nearly slipped on. The shower head also doesn't turn off all the way and leaks often.  It's dated and dumpy.  And here's a breakdown of our goals for the renovation: updated tile that's bright and pretty. A new vanity with lots of storage and two sinks for our two daughters. A larger mirror for maximum users.  A walk-in shower is going to be key. Not only for the older guests but it will just look better. We have a new tub in our bathroom, in case you're thinking "what about resale?!" Which I don't normally consider. Everything is pretty much staying where it is, no major plumbing or electrical is going to be involved, just getting refreshed and working properly. This Fall!  ...

Surprise Bathroom Reno

Image
 Surprise! We're renovating our bathroom!  At the beginning of August, we noticed a wet seam in the ceiling of the kitchen. We assumed it had something to do with the kitchen renovation last year, so we called our contractor to come out and take a peek. Lo and behold our toilet in the primary bathroom, just above, was slowly leaking.  Gross. To sum up, we got the mold remediation guys involved, submitted a claim with our insurance company and hired our buddy General Contractor Bruce ... and now we're renovating the bathroom.  Look, in the back of my mind, while I'm falling asleep at night or while strolling through Pinterest, I have thought about what I'd do when the time came to redo that bathroom. When we moved in, it has been "updated" with grey & white matte tile and marble hex tile. But the bathtub takes up 80% of the bathroom and the tile was never sealed, so it grows dirt/mold like no tomorrow. And it's painted an offending beige and you know h...

Back Hallway (AKA the Boot Room) is Done

Image
Just so good!  I'm so happy with the final result of our back hallway. Removing that wall... just the thing. And I added some fun framed art along the top to bring UP the eye (don't look at all the shoes on the floor) and add a ton of character.  An English boot room? For sure.  Ok, I'd be remiss if I didn't think about the next "phase." Because, as much as I love this, I'll be tempted to add a small cabinet in the corner so I have a countertop to drop keys and mail. But that's likely well down the road.   Even Pepper loves it.  If you missed the evolution of this space ... and it went through several iterations before we got to this ... you can check out this blog tag . 

The Back Hallway Progress

Image
As mentioned, we found some extra budget and made all my back hallway dreams come true this month.  This is where we started. Note the awful pink "terracotta" floor tile that was cracking in the laundry room. The door to the left is the garage, the powder room is to the right. And that door at the end is the coat closet. And the laundry room door is at the end to the right.  Make sense?  My beef with this poky hallway is this closet and this wall. It cuts the floor space into nothing, and if it was gone, it could be an awesome little back ROOM.  Don't worry, this is one of three closets back here. Remember the coat closet at the end? And the laundry room has a closet, too, and cabinets.  We need to remove this wall. And as much as I teased Dave about doing it ourselves, he wasn't buying it. So I made this little drop zone to make the best of it ( here's the post here, for more details ).  So the simple PLAN: Remove the closet, retile the floor -- all the w...

I Tiled! I'm a Tiler! I Tile Now!

Image
 One of the DIY merit badges I've been excited to earn was as a tiler. Every show and contractor/construction guy I've talked to has been insistent it's an "EASY" DIY. "You can totally do it," they say. But I never had the opportunity to give it a go. A nice easy low-risk project.  Until the powder room!  I gathered up my courage, watched all the how-to videos, picked up all the supplies needed (about $250 with the tile) and took a deep breath ... and just GOT WENT FOR IT.  Everything is figuroutable, right!?  It was easy, though there were definitely lessons learned. And quick solutions I had to come up with. But I would very confidently tile another small wall.  First, here's a photo of the IN REAL LIFE mess of a room mid-project. It's important to be OK with creating a mess. Tiling is messy.  Here's the room after the tile is up (took about four hours) and the clean up. Hauling clean water in and out of the room was the worst part. I'l...

New Floor and Vanity in the Powder Room

Image
The downstairs powder room is really coming together much faster than we thought. After an initial text with our contractor, once we had all our materials picked out and our vanity delivered, he was able to fit us in THE SAME WEEK due to a two-day hole in the schedule.  So BAM! In two days they removed the old vanity and floor tile and had to new floor down and vanity nearly installed. Ugh, there was a minor plumbing issue that got resolved on day 3, so on day 4 they officially installed the vanity and were done.  Here's where we started, to where we finished off with the contractors ...    Also! I was able to sell the old vanity on Facebook Marketplace for $350!! That was a solid piece of granite, people! And got it out of our garage in less than 24 hours. A new record!  Next up ... TILE!  

Back Hallway Progress

Image
 Just a few more updates from the back hallway. And here's where we currently stand.  (Will I be buying a third dark gray basket for the top shelf? Yes, yes I will.)  So last weekend I painted the pinky/terracotta floor tile a matte black. Other than not being able to step on it for a few days, it was one of the easiest DIYs and cheap -- about $70. Looks just like the black tile in the kitchen. Unless you stare at it, it's a total dup.  I always forget what a huge difference flooring can make.  Then I decided to paint the interior of the closet/drop zone to match the rest of the walls in this hallway. And I love how it turned out. That oversaturated blue on the beadboard ... it's so good.  I also finished that lower shelf and found bulbs for the ceiling fixture that is SUPER BRIGHT.  Here's a quick walk through the progress of this much-used space ...  I wish I could have taken down that wall, but Dave was not interested in a demo project. Maybe s...

Back Hallway Improvements

Image
There's a dropzone next to the garage door and close to the kitchen that wasn't working for us. So it was time to fix it.  It was once a closet with doors, but there are two other closets in the same hallway so we pulled off the doors and moved in the dresser for storage and spot to drop keys.   But the shoes just piled up around the dresser. And we no longer stored kids' socks next to the door. Or masks. And the top of the dresser wasn't large enough to drop off the mail, purse and keys that I need it for. See? No longer working. So I came up with a plan ...  I tried to convince David to demo out the wall on the right, to add some extra breathing space with the garage door, but I couldn't get him to agree. Regardless, we need a longer countertop, some extra shelves, and a bunch of baskets for allllll the shoes in this house. So many shoes.   Once I cleared everything out, I repainted and attached all the shelf bracing using some scrap wood I had in my gara...

Three Things I've Learned So Far on This Reno

Image
This is our first kitchen renovation, we'd done bathrooms and basements before, and I'm learning a whole lot about how this is all done. Sure, I've learned a bunch from my HGTV shows, but it's obviously far from the real thing. 1. Put your plan up on the wall! As much as I like our contractor Bruce and the guys he brings in to do the jobs, he forgets a lot about the details of the OUR VISION. A perfect example: the plumbers had to come back and hide more plumbing because he forgot we're not having upper cabinets. Taking the advice of some Instagram home designers I follow, I tacked up the cabinet plan and other views on the wall of the kitchen. So I, or Bruce or anyone else around, can reference them.  We've pointed to them so many times in the last few weeks, they're super super important. You have to expect these guys are working on other jobs, so they don't have your plan memorized. This helps so much.  2. Be on sight as much as possible and check in...

Finished the Basement Stairs

Image
When last we discussed, the basement stairs needed some serious help. They were covered with a very old, dirty and smelly carpet.  Here's what it looked like. BLAH.  When we worked on the basement, renovating these stairs were on the original list but it got to be too expensive. And I knew I could do a passable job on a cheap DIY version that would get us through a few years.  So I pulled up the dirty carpet, repairing the risers and trim. And added more trim to cover any gaps. And then painted the stairs a glossy white and installed a carpet runner I've had my eye on for years.  I also painted the walls a deep navy to go with the runner color. The deep color looks especially good through the glass door leading to these stairs.  Just a few things left to do on this project, but I already feel better about walking down to the basement. No longer thinking about all the dirt or smell that came off this carpet. And, really, it's the last really offensive thing in th...

Building More Shelves in the Laundry Room Closet

Image
 You know I love a good closet project!  Our laundry room has this little closet with two wire shelves. You also know how I feel about wire shelving. Ugh!  Here's my SHAME ... after months of living here, that closet looked like this ...  I know.... it's shocking, right?!  After reflecting on what we NEED this space for, I pulled together a very simple plan to add shelving. Yup... Storage by reusing those less-then-classy plastic crates again.  The good news is, I've done this before. ( Evidence here in my old pantry. )  YAY!  Step 1 is to pull off the door (which we don't need), clear out the mess and take down the shelf. I'm leaving that top shelf for several reasons, but mostly as a "just in case." Just in case I need extra coat storage this winter. Here's the cleared out closet:  Notice how the previous owners didn't install baseboards in this closet. WHY?!  So I'll fix that, too.  The next step is to install the cleats tha...

Basement Plans for the TV Area

Image
When Hurricane Ida rolled through, it dumped more rain then the gutters could handle, and therefore dumped rain into a window well and that dumped into our basement. So guess what?! I've got to come up with a plan for the basement ... years before I thought I'd need to. But, here where are. Thanks IDA :/ The basement is pretty chopped up, so let's start with the TV-watching area, as that's the most important to my family and where all of the damage took place.  And here's the plan: First, we need to move the 1,000 lb pool table that you can see peeking just around the corner. That's going into the former gym area where I painted the rainbow mural. It's extremely heavy and we're not sure how we're going to move it there.  So, there's that challenge.  Second, I should also mention that our basement was professionally dried and no mold or other nastiness is growing behind the walls. So rest assured. They were pretty sure water has gotten in through...