
It took two days and about $80 in supplies, and now our kitchen pantry is REBORN!
Here's a quick review of the project in pictures, starting with the BEFORE pictures:
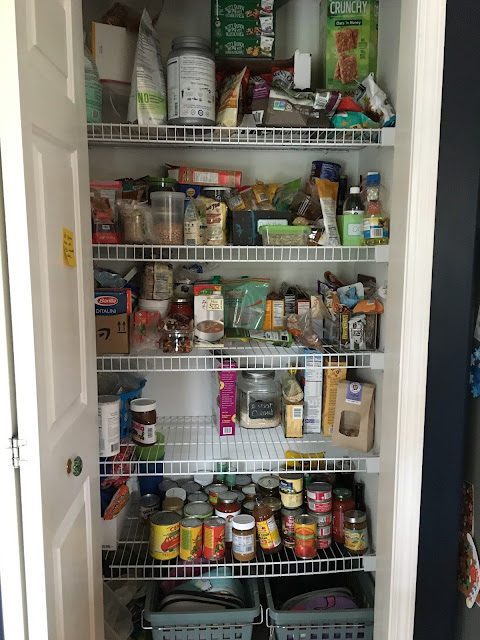 My main issue with the wire shelves were bottles or anything "thin" would tip over. And with my commitment to bulk, I wanted to store glass containers in here but knew they wouldn't be "safe." I foresaw broken glass at some point. Plus, it's a great space, so I knew I could add more storage space if I was strategic. Last, wire shelves are ugly.
So then I demo'd the pantry and painted the walls (which was just primer) with leftover paint from the rest of the house. It's called Polar Bear.
 I paid an electrician to install an outlet at "counter height" in the pantry, so I could move the dumb microwave off the counter. (The electrician did a slew of other small jobs around the house, not just this outlet, including a motion-activated light in this pantry. Tres Fancy!)
Then, using a bunch of tutorials I found (this was one was the most helpful), I bought the supplies for a total of $80 and got down to business. First, installing these braces to the wall -- into the studs -- and then cutting down the MDF shelf to size. Bam.
I pulled out jars, cereal boxes, etc. so I had the "best" fits for all the food I'm planning to store on the shelves. It was gratifying to think everything will fit. But also a bit of pressure -- when a grocery item doesn't fit, it will all be on my shoulders.
I added two half-sized shelves at the very top, which will be great for storing things I don't need everyday but want to know that it's there.
Quick note about big box hardware stores: they are not all the same. I went to a few and Home Depot was the only spot I could find the MDF sheet I needed AND they'd cut it down to size. I don't have a HUGE pickup truck for supplies, so getting at 9x4' sheet cut down was KEY to getting this done.
Plus, women still get strange looks in the hardware stores then they're looking at large pieces of wood and hardware. Yup. Gender bias is alive and well in hardware stores.
 On the second day, I added the trim to the front of the shelves that makes them "pretty" using a few penny nails and wood glue. And calked all the trim; anywhere there was a joint. A messy job but satisfying.
 Then, it was just paint, a bit more calking and touch-ups.
I used chalk paint in linen white for a very matte finish. I didn't want the paint to sweat and boxes to stick like they do on dressers I've painted in the past. I might put down contact paper if there's a problem with wood scratches. I'll let you know.
 The BIG after reveal is coming soon.
I'm waiting for paint to dry before I to reload the pantry (and get all the pantry food that's in baskets all over the floor). And I'm missing my label-maker, because I obviously want everything to be BEAUTIFUL and organized.
I will admit that in my original plan I was going to change the doors on the pantry from this cheesy "bifold" to French doors. I made the conversion up in the girls' rooms for their closets, so I was planning to do the same in the kitchen. But the results I got with those closets were less-than-stellar so I'm keeping the bifold for now. Though, they need to be repainted with our trim color.
So there you have it. The pantry has been reclaimed and beautified! And for such a small cost. I wonder if the wire shelving unit cost more? Hmm.
Off to the next home improvement project ...
Related post:
The Kitchen update start
Here's a quick review of the project in pictures, starting with the BEFORE pictures:

So then I demo'd the pantry and painted the walls (which was just primer) with leftover paint from the rest of the house. It's called Polar Bear.

Then, using a bunch of tutorials I found (this was one was the most helpful), I bought the supplies for a total of $80 and got down to business. First, installing these braces to the wall -- into the studs -- and then cutting down the MDF shelf to size. Bam.
I pulled out jars, cereal boxes, etc. so I had the "best" fits for all the food I'm planning to store on the shelves. It was gratifying to think everything will fit. But also a bit of pressure -- when a grocery item doesn't fit, it will all be on my shoulders.
I added two half-sized shelves at the very top, which will be great for storing things I don't need everyday but want to know that it's there.
 |
| Getting It All Level Was the Hardest Part |
Plus, women still get strange looks in the hardware stores then they're looking at large pieces of wood and hardware. Yup. Gender bias is alive and well in hardware stores.


I used chalk paint in linen white for a very matte finish. I didn't want the paint to sweat and boxes to stick like they do on dressers I've painted in the past. I might put down contact paper if there's a problem with wood scratches. I'll let you know.

 |
| The Displaced Food |
I will admit that in my original plan I was going to change the doors on the pantry from this cheesy "bifold" to French doors. I made the conversion up in the girls' rooms for their closets, so I was planning to do the same in the kitchen. But the results I got with those closets were less-than-stellar so I'm keeping the bifold for now. Though, they need to be repainted with our trim color.
So there you have it. The pantry has been reclaimed and beautified! And for such a small cost. I wonder if the wire shelving unit cost more? Hmm.
Off to the next home improvement project ...
Related post:
The Kitchen update start
Comments
Post a Comment