Posts

Showing posts with the label hallway

Back Hallway Progress

Image
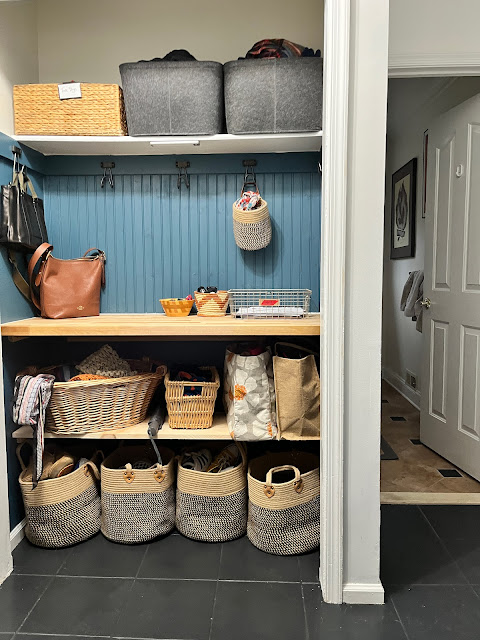
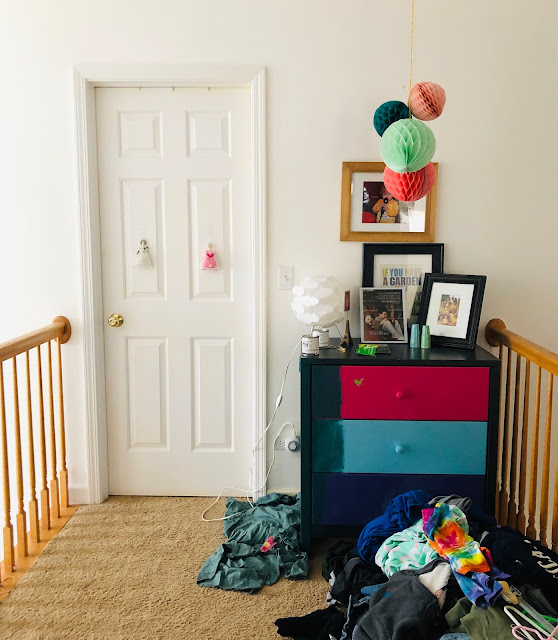
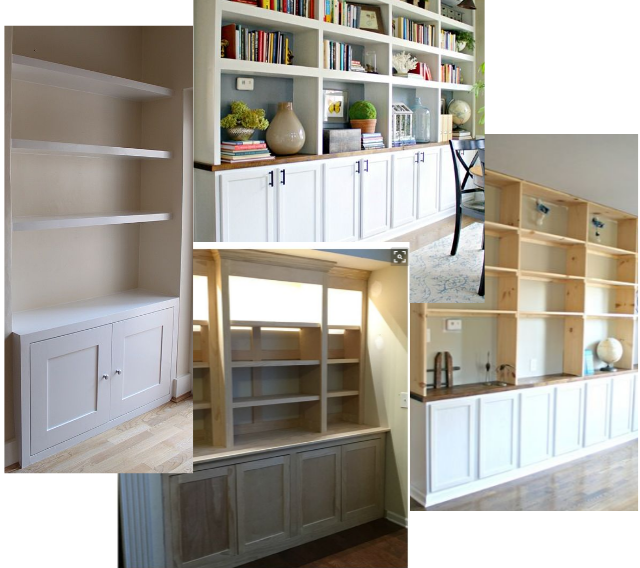
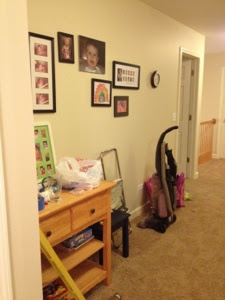
 Just a few more updates from the back hallway. And here's where we currently stand.  (Will I be buying a third dark gray basket for the top shelf? Yes, yes I will.)  So last weekend I painted the pinky/terracotta floor tile a matte black. Other than not being able to step on it for a few days, it was one of the easiest DIYs and cheap -- about $70. Looks just like the black tile in the kitchen. Unless you stare at it, it's a total dup.  I always forget what a huge difference flooring can make.  Then I decided to paint the interior of the closet/drop zone to match the rest of the walls in this hallway. And I love how it turned out. That oversaturated blue on the beadboard ... it's so good.  I also finished that lower shelf and found bulbs for the ceiling fixture that is SUPER BRIGHT.  Here's a quick walk through the progress of this much-used space ...  I wish I could have taken down that wall, but Dave was not interested in a demo project. Maybe s...

Back Hallway Improvements

Image
There's a dropzone next to the garage door and close to the kitchen that wasn't working for us. So it was time to fix it.  It was once a closet with doors, but there are two other closets in the same hallway so we pulled off the doors and moved in the dresser for storage and spot to drop keys.   But the shoes just piled up around the dresser. And we no longer stored kids' socks next to the door. Or masks. And the top of the dresser wasn't large enough to drop off the mail, purse and keys that I need it for. See? No longer working. So I came up with a plan ...  I tried to convince David to demo out the wall on the right, to add some extra breathing space with the garage door, but I couldn't get him to agree. Regardless, we need a longer countertop, some extra shelves, and a bunch of baskets for allllll the shoes in this house. So many shoes.   Once I cleared everything out, I repainted and attached all the shelf bracing using some scrap wood I had in my gara...

Little Dresser Painting Project

Image
If I haven't gotten a paint brush in my hand and totally transformed a space/furniture for a while, I get the shakes. That's just how much I love painting things! Love it. So this weekend, while I'm still trying to re-balance and figure out how I'm going to do all the house projects in the abbreviated time I now have with a full time job, I made all effort to paint something. Anything! And this little dresser, which I see every day on the second floor landing, was just the perfect candidate. The story of this dresser goes waaaay back to California, when we were single and living in a small apartment in the Bay Area. We drove to Ikea near Berkeley and bought a new wood dresser set; this little three-drawer dresser has a taller counterpart. Right around the time Leah was born, we painted it a very dark grey (it quickly chipped and was sticky -- my first lesson in the type of paint to use on furniture). And in this house, it was needed in Alice's room so I bought...

The Glorious Hallway Makeover is Complete

Image
I loved all my options but the budget/time factor just got to be too much. We really just need something to keep it organized and looking nice until we permanently move home. So, we drove to Ikea and spent about $130 on three Billy bookcases , and $50 at Home Depot getting more of the white paint ("Polar Bear" from Behr) for the walls. And that's it. AFTER: White and Clean and Full of Books! Honestly, I'm so happy with the results, I could do cartwheels! Here's that Before picture again ... BEFORE: Reminder, This is What It Looked Like Painting the walls only took me a day. And the Ikea Billy shelves had to be propped up a bit, so we rigged up some scrap wood we had in the basement to ensure it was level on the carpet. We also installed the topple-guards. The books were piled in a few corners (the bookshelves were moved to Paris), so they now have a good home. I might install some quarter-round trim to give it a more "built-in" look, but ...

Hallway Makeover Shelving Ideas

Image
Option 2 for the upstairs hallway is built-in shelves . Similar to the Option 1 in that I'd find already-made cabinets and fit shelves above it so it all looks custom and built-in. Here's the Pinterest board inspiration (search Built in Shelves) ... And it would look something like this ... This looks easy but a lot of holes in the wall. Now to get to work on one of these options ... Related posts: The Upstairs Hallway BEFORE pic My Pinterest Home Decor board

Planning Hallway Improvement Take 1

Image
Option 1 for the upstairs hallway is the built-in desk along the wall . By purchasing a countertop and laying it across two cabinets or drawers I'd have a quick, long desk. And by adding some trim and paint, I could get a custom built-in look. ( See the Before picture .) Here's some inspiration from Pinterest (search "built-in desk diy"): Built-Ins Aspirations Here's my quick little layout of the plan... Looking through some sites for materials, Ikea seems like the obvious spot. The countertops there are inexpensive and we can match the pine that's all over the house. For $139, that's a total win. And base cabinets are around $250 and come in variety of colors, but once I got the color combinations right it would definitely give me a more professional look. Maybe a white front? Link http://www.ikea.com/us/en/catalog/products/S89036699/#/S49036842 Or I could think outside the box a little and find two nice cabinets to anchor th...

The Upstairs Hallway Gets a Plan

Image
This green hallway is at the top of the stairs and is between the girls' bedrooms. It's a hallway we walk through everyday and everyday I roll my eyes at the lack of order and function. I love to store books here and the kids' masterpieces on this little DIY art hanger ( here's how to make it ). But, otherwise, this space is a disaster. My own little pit of despair and it's slowly driving me crazy. Even from Paris. The plan for our first full week at home is getting cleaned up for all our upcoming visitors and this is one spot I really want to focus on. First, I want to repaint. White, probably. Second, I want to find a plan for this space that includes built-ins, so it looks really clean and on-purpose. Not a storage area for random things. I have two options I've been thinking about a lot. Option 1: Do a built-in desk along this wall. Coincidently, the original plans for this house includes a desk in this space but the original builders opted o...

Wall of Restraint is Now WHITE!

Image
Extra! Extra! The green wall is gone! And The Wall of Restraint will need a new name, as it's now getting all decked out. And I'm OK with it. To summarize, this wall is near the garage entrance to the house. And it's a very visible wall, as you can see it from several parts of the house. I've been congratulating myself for not stuffing it with art/pictures, etc. since we moved in. It was the wall I was not going to install hooks on and keep it as a calm focal point. Thus, the Wall of Restraint. But, after four years, I got pretty tried of the moss green color and not having anything to rest my eye on when I gaze in this direction. So, I've been slowing changing it. First came the board to divide up the wall (which is 12 feet high) and then paint color -- white to match the neighboring walls. Ta da! BEFORE! Green Monster! AFTER! White and Bright! I've been home since October, so it's a bit surprising how long its taken me to paint a wall. I l...

Hooks In the Back Hall

Image
In Progress I've been resisting adding hooks on the long hallway off the garage entrance ( as posted here ). But OMG if I have to STEP on another bag or sweater thrown on the floor I'm going to LOSE IT. (!!) We have hooks all over this house for a reason, people! In a fit of rage, I bought a piece of trim and ordered a bunch of hooks in a variety of colors for that wall. But then decided ... maybe if I improve this wall -- which sits directly opposite from the garage entrance -- I might solve the problem without adding yet another wall with hooks. So, I got these little pine boards and some neato steal hooks and used Saturday night while the girls were away to install the whole system. Replacing the dinky row of pegs that just wasn't doing the job. It went up very quickly, finishing it up while the girls watched Frozen on Sunday morning after their sleepover. I included a sign that says "Hey You! Hang Up Your Stuff" on the magnet board just above it. J...

The Trim Project Gets Underway!

Image
The trim is biege. I dislike biege. Especially in trim. Plus, they needed a new coat of paint after 15 years and two owners. Hence, the Trim Project of 2014! I declared open season on painting last weekend, so the work begins!  There is miles and miles of baseboards and doors to do in this house, so I'm expecting this to go well into the summer months.  Little by little -- we'll just chip away at it.  P.S. Benny says Hi. 

Back Hall Rug Upgrade

Image
In the back hallway that leads to the garage we've had these rose-colored rugs since we moved in. They belonged to the previous owners and looked kinda nice with the wood floors. But completely useless with all the muddy, dirty, snowy boots that tramp in from the garage. Before: Two Rugs in the Back Hallway So, I've been researching options for that hallway and decided on the Waterhog rug from L.L. Bean . They had tons of different sizes and colors. And I've never read so many super reviews. The clincher was the price. For the size and quality -- much less then the other rugs I'd looked at. I picked this snazzy green color that goes so well with the wall color. I had to cover-up the heating vent back there, but I think it's worth it. What a Difference a Rug Makes! After: Neat and Clean! Related posts: More "Home Project" posts

Hallway Project: Green Continued

Image
BEFORE: The Art Gallery I was painting again this weekend. My project was all about the hallway between the family room and the rest of the house. There are two major issue: 1) a lot of the walls have rounded corners, so where to start and stop always stumped me. 2) And I wanted green, so I've been trying to decide which shade to go with. My first choice was the bright green from the carpet squares. I'd love to do a bold apple-green wall. Sweet! But then I realized I like the color of the upstairs hallway and it compliments the navy wall. And since you can see that wall from downstairs, it made the most sense to keep a consistent green. (Valspar's "Grasslands" from Lowes.) The rounded corners is still an issue, if I think too much about it, there's a sort-of wall solipsism. But why over think it? I started and stopped when I wanted to and it doesn't look too bad. AFTER: A 2-Story View Actually, it looks awesome! Clean and freshly green....

Upstairs Hallway Complete!

Image
Before: Messy Hallway It wasn't what I planned earlier  for the upstairs hallway, but it came out pretty well.  This is the hallway, that connects the girls' rooms and the bathroom. It had to be green, because the carpeting on the stairs is green (with golden ivy; more on that in a later post). Once I painted the room green (Valspar "Grassy Meadow") it looked far smaller and my cabinet idea was tossed -- it would have complicated the space.  I had a shelving unit from the pervious owners of our last house -- it was stored in the basement. And I do like to reuse! It made me very nervous to drill the HUGE holes in the wall. Luckily, I'm generally reckless when it comes to home improvement so I got up the nerve and drilled away.  I'll need to style the shelving a bit better -- and I'd like to add another shelf to the mix ($14 at Loews) -- but it's a start. That framed map has been in almost every room in the house, so hopefully it has f...